How to reclaim disk space from virtual machines with thin virtual disks in VMware vSphere.
The thin disks will start very small and grow as data is added within the VM, however if data is logically deleted inside the VM the thin disk will not shrink. If there is a large difference between the amount of data stored by the VM and the space consumed by the virtual disk file it could be worth to reclaim the space.
In this example we have a thin provisioned VMDK file with the size of 8 GB, which is the size of the disk as it appears to the virtual machine, in this case a Windows 2003 Server.
Inside the guest VM we can see that the used space are about 1.72 GB out of this 8 GB and there is a large percentage of free disk.
From the Datastore Browser from the vSphere Client we could however see that the VMDK file is consuming around 4.6 GB on the datastore, even as the VM itself only stores 1.7 GB. Most likely this condition comes from files that once existed inside the VM and later has been deleted.
When files are deleted inside Windows only the logical information about the files are removed, but the physical content of the file is left on the disk area, later to be overwritten by other files.
Two problems must now be solved:
1. Since the VMkernel has no possibility to read or understand guest filesystems like NTFS we can never reclaim the space until these blocks are actually zeroed from inside the guest. We must use some extra tool for this.
2. There are no real shrink function in vSphere, but we could use a trick involving datastores with different VMFS blocksizes together with Storage vMotion.
To solve the first problem we could use a tool like Sdelete.exe from the Sysinternals suite, available as free download from Microsoft. Get the file and extract it inside the VM.
Make a note of the drive letter for the partition that we want to reclaim space from and run:
sdelete -z DRIVELETTER
This tool will now write zeros into every empty part of the partition. This means that you will get a very large amount of write IOs going to the storage, which makes this most suitable to do off peak hours.
This will also make the VMDK file to expand to its full size. It is very important to make sure in advance that there is enough space in the current datastore for this.
The next step is to locate a VMFS datastore with a different block size than the currect datastore. This seems strange, but is crucial and it will not work if using equal blocksizes. If using VMFS 5 the option of actually selecting the blocksize is no longer available and all new VMFS 5 datastores are created with the blocksize of 1 MB. This is good and removes other issues, but means that you need one VMFS 3 datastore during the reclaim phase.
If you only use VMFS 5 then you might have to create a new LUN on the Fibre Channel or iSCSI SAN and format this with VMFS 3. Make sure to select a different block size than the current datastore. The LUN is only used temporarily and should in size just be enough the hold the VM during the reclaim process.
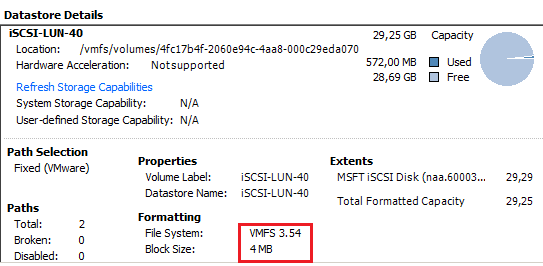
Select the datastore and view the Datastore Details to verify the block size. In this case it is 4 MB and will work to do the transfer from the 1 MB blocksize of the current datastore.
Then use Storage vMotion to transfer the VM disk to the VMFS 3 datastore. Depending on the size of the VMDK and the performance of the SAN and the transfer method (FC or iSCSI) this will take some time naturally.
After the Storage vMotion is complete you should use the Datastore Browser on the new datastore and see how much space was reclaimed. In this case we see that the VMDK file size now match almost exactly the amount of data consumed by the internal Windows guest and all “dead space” has been restored to the datastore.
The final step is now to transfer the VM back to its original location. Since these actions (first zeroing with the sdelete tool and two Storage vMotions) are very disk intensive it could be best to accomplish these actions during non peak hours.


